
I recently started working with April tags, since they seem cool & you see them all over the place (used as fiducials for robots trying to walk around a somewhat unstructured environment).

the internet fell short (feel free to skip this section)
It was surprisingly hard to find instructions to get started, my search-fu was failing me. My search results turned up the original “official” website from the April Robotics Laboratory at University of Michigan, https://april.eecs.umich.edu/software/apriltag.html
This had no “getting started” instructions on it. Same for the C++ wrapper by a researcher at CSAIL (now a professor who I met at CMU!) https://people.csail.mit.edu/kaess/apriltags
And same for the ROS wrapper around the Apriltags, which also confusingly seems to have several version that may or may not now be the same. http://wiki.ros.org/apriltags_ros and https://github.com/xenobot-dev/apriltags_ros
(oh wait neat, there are instructions at https://cmumrsdproject.wikispaces.com/AprilTags_ROS). However, I’m still not terribly familiar with ROS, so I wasn’t too enthused about using this wrapper.
Fortunately Patrick over at Kuindersma’s lab above me was able to get me started.
getting started
- Download and install C++ wrapper as per instructions at https://people.csail.mit.edu/kaess/apriltags/
See below: -
sudo apt-get install subversion cmake libopencv-dev libeigen3-dev libv4l-dev
sudo port install pkgconfig opencv eigen3
svn co https://svn.csail.mit.edu/apriltags
cd apriltags
make
./build/bin/apriltags_demo
- Yay, now a window pops open (see “troubleshooting” if it doesn’t, as was the case for me) with a video stream. But we need tags for it to recognize!
Getting tags
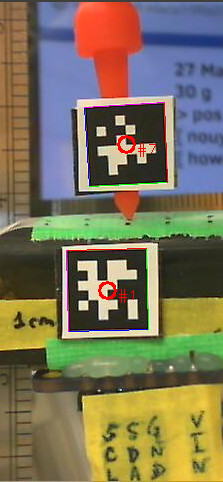
I actually found this pretty annoying, the zipped files on those sites give you a thousand options and it’s not clear which ones will work. So for me, I actually had my friend give me four tags that definitely work.


ID = #0 #1 #6 and #7 tags.
- Print out tag
- Run
./build/bin/apriltags_demo
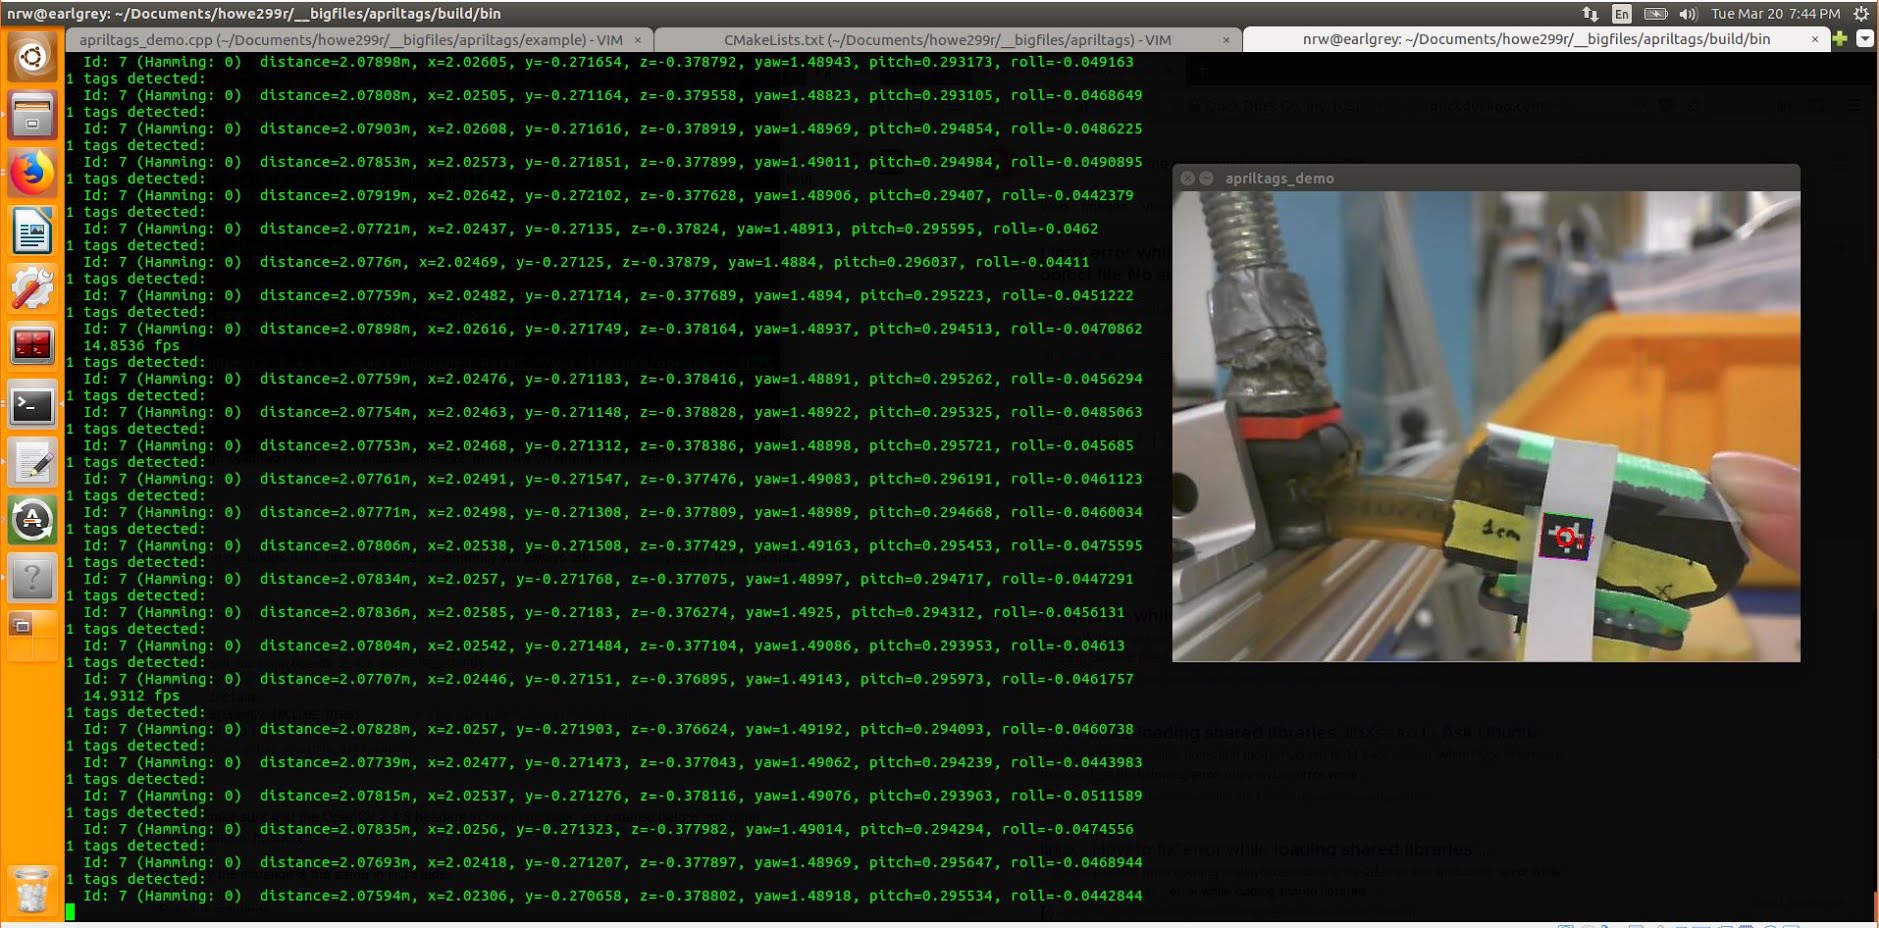
- Now stick the tag in front of your camera. In the videostream you should now see a circle. In the terminal you should now see data streaming out.
- The data display shows distance (from the camera to the tag), the xyz location of the center of the tag, as well as the roll, pitch, and yaw. These coordinates will depend on which side you put pointing up when you pasted the tag on, so beware. In fact, none of the data should be taken as absolute until you calibrate your camera.
2 tags detected:
Id: 1 (Hamming: 0) distance=0.079741m, x=0.000532, y=0.006102, z=-1.487915, yaw=-0.134615, pitch=0.071828, roll=-0.041146
Id: 7 (Hamming: 0) distance=0.079741m, x=0.000532, y=0.006102, z=-1.487915, yaw=-0.134615, pitch=0.071828, roll=-0.041146
14.9312 fps
calibrate camera
I wandered for a while lost in the lands of https://docs.opencv.org/2.4/doc/tutorials/calib3d/camera_calibration/camera_calibration.html
Fortunately, eventually I found my way to a python library that made the whole process super simple. I ignored the above link (to official openCV docs) entirely. Instead, I used the following python package. All I had to do was print out the checkerboard pattern included in the repository, wave it in front of the camera and record a short video, run the python file, and bam! I had the configuration.yaml file I needed.
https://github.com/smidm/video2calibration
To get it working, I did have to make sure I had pyyaml installed
 (venv) nrw@earlgrey:$ sudo -H pip install pyyaml --upgrade
This project is super awesome and included an example you can run right away and inspect. The following line, run in the root takes in the video included in the repo (chessboard.avi) and outputs the resulting configuration file to “calibration.yaml”.
(venv) nrw@earlgrey:~/projects/video2calibration$ ./calibrate.py example_input/chessboard.avi calibration.yaml --debug-dir out
At this point I printed out the checkboard pattern included in the repository, put it on a stiff surface, and then opened cheese (you don’t have to use cheese, we just need to record a video).
Then I waved my board around in front of the camera and recorded a short video.
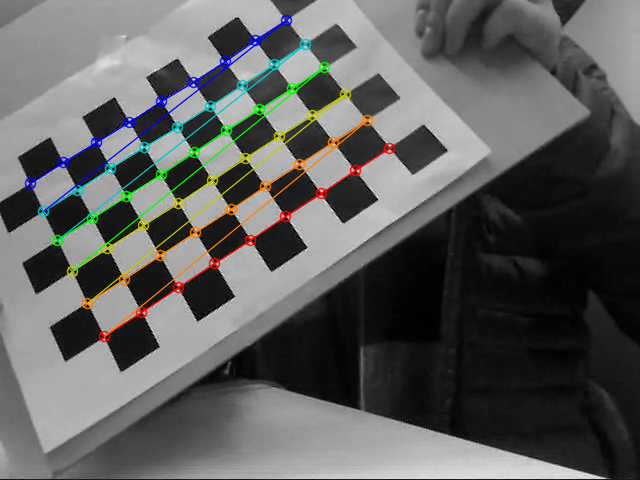
wheeeeee
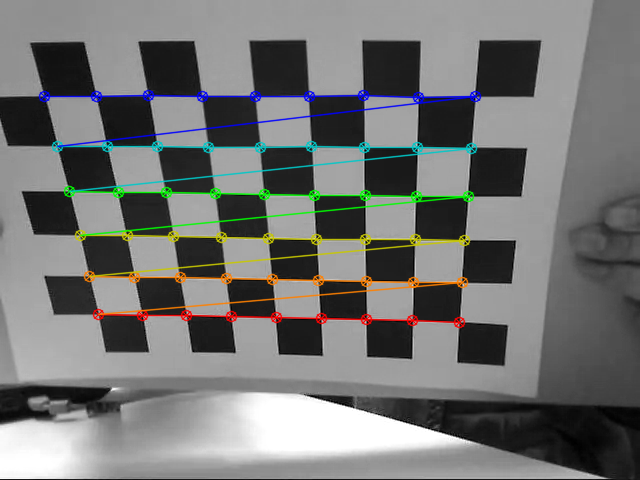
Anyhow, I record ten or fifteen seconds of video. Then I ran
nrw@earlgrey:~/projects/video2calibration$ ./calibrate.py ~/Videos/Webcam/2018-03-26-112657.webm calibration.yaml --debug-dir out

Performing calibration...
 RMS: 0.442700776066
 camera matrix:
 [[ 666.78668352    0.          343.73827809]
 [   0.          665.79103853  227.19081685]
 [   0.            0.            1.        ]]
 distortion coefficients:  [  6.06301194e-02  -1.94620209e-02   1.45555284e-04   1.24410189e-03
 -2.51439333e-01]
Input calibration parameters into source code
Edit into the demo file
nrw@earlgrey:~/projects/apriltags/example$ vi apriltags_demo.cpp
Specifically, we want to change the following section. Note that we are using the definition of the rotation matrix to pull out (from the calibration.yaml output) the focal point and principal point parameters.
public:

  // default constructor
  Demo() :
    // default settiwgs, most can be modified through command line options (see below)
 [...excerpted section...]
    m_width(640),
    m_height(480),
    m_tagSize(0.00944), // in meters
    m_fx(667), // in pixels
    m_fy(666), //
    m_px(344), // principal point
    m_py(227),
Ah! I forgot, we also needed to measure, using a ruler (or calipers), the size of the apriltag in real life. So just measure one of the sides of the tag (which should be square…) and put it inoto m_tagSize. (The width and height should be the size in pixels of the image from the video camera).
Compile and run (use “make clean” if the build fails, then run “make” again)
nrw@earlgrey:~/projects/apriltags/example$ cd ..
nrw@earlgrey:~/projects/apriltags/$ nrw@earlgrey:~/projects/apriltags/example$ make
Then run the program:
nrw@earlgrey:~/projects/apriltags/$ ./build/bin/apriltag_demo
One easy way to double-check whether the camera is roughly calibrated is to physically measure the distance between the camera and the tag, and then compare to the “distance” output in your terminal. Hopefully they match…
Units
The roll, pitch, and yaw are reported in radians. To convert into degrees, multiply by 57.3 (approximately).
Framerate
A framerate of 17fps or so is totally reasonable, since the apriltags demo is decently compute intensive. I had a problem with lag, where the video ran smoothly but with a significant lag — this may have been a result of me running the entire thing in a virtual machine. Let me know if you don’t have lag!
Troubleshooting
I had a somewhat frustrating beginning where I couldn’t get the example program to run.
-- Found OpenCV: /opt/ros/lunar (found version "3.3.1")
 framerate (17fps raesonable, but lag???)
 output is in radians
 9.23346 fps
 0 tags detected:
 0 tags detected:
 0 tags detected:
 0 tags detected:
 0 tags detected:
 0 tags detected:
 0 tags detected:
 0 tags detected:
 1 tags detected:
 OpenCV Error: Assertion failed (mtype == type0 || (((((mtype) & ((512 - 1) << 3)) >> 3) + 1) == 1 && ((1 << type0) & fixedDepthMask) != 0)) in create, file /tmp/binarydeb/ros-lunar-opencv3-3.3.1/modules/core/src/matrix.cpp, line 2542
 terminate called after throwing an instance of 'cv::Exception'
 what():  /tmp/binarydeb/ros-lunar-opencv3-3.3.1/modules/core/src/matrix.cpp:2542: error: (-215) mtype == type0 || (((((mtype) & ((512 - 1) << 3)) >> 3) + 1) == 1 && ((1 << type0) & fixedDepthMask) != 0) in function create
Id: 15 (Hamming: 1)Aborted (core dumped)
It turned out that because I had ROS installed, or perhaps also because I installed the “apriltags” ROS wrapper, I was having openCV version conflicts.
/tmp/binarydeb/ros-lunar-opencv3-3.3.1
vs
nrw@earlgrey:~$ pkg-config --modversion opencv
 2.4.9.1
To solve, I simply had to edit one line in the CMakeLists.txt to force it to use the right version of openCV. I added an “exact required” tag, along with my openCV version (2.4.9.1), to the appropriate line.
nrw@earlgrey:~/projects/apriltags$ vi CMakeLists.txt
(line 14)
find_package(OpenCV 2.4.9.1 EXACT REQUIRED)
Then I ran “make” and
nrw@earlgrey:~/projects/apriltags/$ ./build/bin/apriltag_demo
and the example program worked! Huzzah.
the end.
Hi,
Great tutorial. I’m trying to get the distance and coordinates of the April tags from the camera’s view in real-time but the format of the detection output is different from your tutorial. I’m using the AprilTags from https://github.com/swatbotics/apriltag and I use the python wrapper that is included in the package. My goal is to get the (x, y) coordinates of a tag placed on top of a projected matrix or grid and update the map with some info where the April tag is located. If you can help me with your two cents, I will really appreciate it.
Thanks
Hi, thanks! I haven’t used that library, though I took a look. I’m not sure your problem…? What’s your current output and what’s your desired output? Is it the “drawing a grid on the image” part you’re wondering how to do?
Hi,
So I have a camera that is looking at a grid or matrix and when I place an April tag on one cell, I want to get the X and Y location of that tag relative to the grid/matrix and the distance from the camera. It looks like the library you are using does that but the library that I use does not come with the “getRelativeTranslationRotation” function. The library that I use outputs the homography, centers, and corners in a matrix-like format and I need that library because it has a python wrapper and I’m using Python for my project. Do you know a workaround to convert the homography, centers, and corners values to something similar to your example in “Getting tags” step 4? thanks.
Hi Carlos, Sorry for the delay. So, to confirm, you’d like to get the pose (xyz roll pitch yaw) of the tag, but your python library gives you ? If that’s the case, I don’t actually immediately know how. If you’ve figured it out, please let me know how it was done. Otherwise, could you copy and paste some example output from your python wrapper, or alternatively post a a link to the library?
In case it’s useful, you can read the source code for the “getRelativeTranslationRotation” function here:
https://github.com/NifTK/apriltags/blob/ccb00cf6324a5b0f8e901a422c8a644ea7324416/src/TagDetection.cc#L114
Cheers!
Hi! I actually solved this problem (decided to switch my implementation to python). This comment is a reminder to myself to blog it soon (I solved it last Sunday…).